'분류 전체보기'에 해당되는 글 243건
- 2011.08.25 :: Understanding and Solving Internet Explorer Leak Patterns 자바스크립트 메모리 릭
- 2011.08.24 :: 자바 스크립트 메모리 누수 방지법
- 2011.07.22 :: ORA-22992: 원격 테이블로 부터 선택된 LOB 위치를 사용할 수 없습니다.
- 2011.07.22 :: Unix에서 오라클 9.2 TNS 재가동.
- 2011.07.12 :: 자바 개발자와 시스템 운영자를 위한 트러블 슈팅 이야기
- 2011.07.11 :: 자바 개발자를 위한 이클립스 바이블
- 2011.07.07 :: 협상의 법칙 1,2
- 2011.07.05 :: 전문가를 위한 오라클 데이터베이스 아키텍처(제2판)
- 2011.07.01 :: 프로그래머의 길, 멘토에게 묻다
- 2011.06.30 :: 프록시, 프록시 패턴, 데코레이터 패턴
- 2011.06.29 :: AOP(Aspect Oriented Programming) in Java
- 2011.06.28 :: 오라클 특수문자 입력(sqlplus)
- 2011.06.17 :: iframe resize
- 2011.04.23 :: 자바 쉘스크립트 실행.
- 2011.02.01 :: weblogic classNotFoundException
- 2011.02.01 :: 아파치 DirectoryIndex 설정.
- 2010.12.30 :: 웹로직 아파치 연동
- 2010.12.03 :: Log4J 설정방법 및 웹로직에서 사용방법
- 2010.12.01 :: varchar와 nvarchar의 차이점
- 2010.10.22 :: 정규식 - 라인 중간 중간 해당하는 단어 찾기
- 2010.10.01 :: dummy 테이블
- 2010.07.16 :: Google Blogger API 사용
- 2010.06.05 :: 운동화를 신고 나는 발냄새 간단히 제거하는 방법
- 2010.05.15 :: 정보처리기사 출제 기준
- 2010.05.15 :: table 태그 대체
- 2010.05.15 :: javamail
- 2010.05.15 :: 화면효과
- 2010.04.30 :: 배열을 복사하는 법(메소드)
- 2010.04.07 :: 테이블명/컬럼명 변경, 컬럼추가/제거, UNIQUE설정해제, PK 변경
- 2010.04.06 :: xml-rpc 를 이용한 티스토리(tistory) metaweblog api 자바(java)프로그래밍
Justin Rogers
Microsoft Corporation
June 2005
The Evolution of the Web Developer
In the past, memory leaks haven't posed huge problems for Web developers. Pages were kept relatively simple and navigation between different locations within a site was a great way to clean up any loose memory. If there was a leak, it was most likely small enough to go unnoticed.
New Web applications live up to higher standards. A page might run for hours without being navigated and retrieve updated information dynamically through Web services. Language features are pushed to the breaking point by combining complex event schemes, object-oriented JScript, and closures to produce entire applications. With these and other changes, certain memory leak patterns are becoming more prominent, especially those previously hidden by navigation.
The good news is that memory leak patterns can be easily spotted if you know what to look for. Most of the troublesome patterns you might face have known workarounds requiring only a small amount of extra work on your behalf. While some pages might still fall prey to small memory leaks, the most noticeable ones can be easily removed.
Leak Patterns
The following sections will discuss patterns of memory leaks and point out some common examples of each pattern. One great example of a pattern is the closure feature of JScript, while another example is the use of closures in hooking events. If you're familiar with the event hooking example, you might be able to find and fix many of your memory leaks, but other closure-related issues might go unnoticed.
Now, let's look at the following patterns:
-
Circular References—When mutual references are counted between Internet Explorer's COM infrastructure and any scripting engine, objects can leak memory. This is the broadest pattern.
-
Closures—Closures are a specific form of circular reference that pose the largest pattern to existing Web application architectures. Closures are easy to spot because they rely on a specific language keyword and can be searched for generically.
-
Cross-Page Leaks—Cross-page leaks are often very small leaks of internal book-keeping objects as you move from site to site. We'll examine the DOM Insertion Order issue, along with a workaround that shows how small changes to your code can prevent the creation of these book-keeping objects.
-
Pseudo-Leaks—These aren't really leaks, but can be extremely annoying if you don't understand where your memory is going. We'll examine the script element rewriting and how it appears to leak quite a bit of memory, when it is really performing as required.
Circular References
Circular references are the root of nearly every leak. Normally, script engines handle circular references through their garbage collectors, but certain unknowns can prevent their heuristics from working properly. The unknown in the case of IE would be the status of any DOM elements that a portion of script has access to. The basic principle would be as follows:

Figure 1. Basic Circular Reference Pattern
The cause of the leak in this pattern is based on COM reference counting. The script engine objects will hold a reference to the DOM element and will be waiting for any outstanding references to be removed before cleaning up and releasing the DOM element pointer. In our case we have two references on the script engine object: the script engine scope, and the DOM element expando property. While terminating the script engine will release the first reference, the DOM element reference will never be released because it is waiting on the script engine object to release it! You might think it would be easy to detect this scenario and fix the problem, but in practice the basic case presented is only the tip of the iceberg. You could have circular references at the end of a 30 object chain and those would be much harder to detect.
If you are wondering what this pattern looks like in HTML, you can cause a leak by using a global script engine variable and a DOM element as shown.
<html>
    <head>
        <script language="JScript">

        var myGlobalObject;

        function SetupLeak()
        {
            // First set up the script scope to element reference
            myGlobalObject =
                document.getElementById("LeakedDiv");

            // Next set up the element to script scope reference
            document.getElementById("LeakedDiv").expandoProperty =
                myGlobalObject;
        }


        function BreakLeak()
        {
            document.getElementById("LeakedDiv").expandoProperty =
                null;
        }
        </script>
    </head>

    <body onload="SetupLeak()" onunload="BreakLeak()">
        <div id="LeakedDiv"></div>
    </body>
</html>
To break the leak pattern you can make use of explicit null assignments. By assigning null before the document unloads you are telling the script engine there is no longer an association between the element and the object inside the engine. It can now properly clean up references and will release the DOM element. In this case, you as the Web developer know more about the relationships between your objects than the script engine does.
While that is the basic pattern, it can be difficult to spot more complex scenarios. A common usage of object-oriented JScript is to extend DOM elements by encapsulating them inside of a JScript object. During the construction process, you generally pass in the DOM element you want to attach to and then store a reference to the DOM element on the newly constructed object while at the same time storing an instance of the newly constructed object on the DOM element. That way your application model always has access to everything it needs. The problem is this is a very explicit circular reference, but because it uses different language aspects it might go unnoticed. Breaking up this kind of pattern can become more complex, and you can use the same simple methods discussed earlier.
<html>
    <head>
        <script language="JScript">

        function Encapsulator(element)
        {
            // Set up our element
            this.elementReference = element;

            // Make our circular reference
            element.expandoProperty = this;
        }

        function SetupLeak()
        {
            // The leak happens all at once
            new Encapsulator(document.getElementById("LeakedDiv"));
        }

        function BreakLeak()
        {
            document.getElementById("LeakedDiv").expandoProperty =
                null;
        }
        </script>
    </head>

    <body onload="SetupLeak()" onunload="BreakLeak()">
        <div id="LeakedDiv"></div>
    </body>
</html>
More complex solutions to this problem involve registration schemes to note which elements/properties need to be unhooked, having the peer element hook events so that it can clean up before the document unloads, but often you can run into additional leak patterns without actually fixing the problem.
Closures
Closures are very often responsible for leaks because they create circular references without the programmer being fully aware. It isn't immediately obvious that parent function parameters and local variables will be frozen in time, referenced, and held until the closure itself is released. In fact this has become such a common programming tactic, and users have run into issues so often, there are quite a few resources already available. Because they detail some of the history behind closures as well as some of the specific instances of closure leaks we'll check those out after applying the closure model to our circular reference diagram and figuring out where these extra references are coming from.

Figure 2. Circular References with Closures
With normal circular references there were two solid objects holding references to each other, but closures are different. Rather than make the references directly, they are made instead by importing information from their parent function's scope. Normally, a function's local variables and the parameters used when calling a function only exist for the lifetime of the function itself. With closures, these variables and parameters continue to have an outstanding reference as long as the closure is alive, and since closures can live beyond the lifetime of their parent function so can any of the locals and parameters in that function. In the example, Parameter 1 would normally be released as soon as the function call was over. Because we've added a closure, a second reference is made, and that second reference won't be released until the closure is also released. If you happened to attach the closure to an event, then you would have to detach it from that event. If you happened to attach the closure to an expando then you would need to null that expando.
Closures are also created per call, so calling this function twice will create two individual closures, each holding references to the parameters passed in each time. Because of this transparent nature it is really easy to leak closures. The following example provides the most basic of leaks using closures:
<html>
    <head>
        <script language="JScript">

        function AttachEvents(element)
        {
            // This structure causes element to ref ClickEventHandler
            element.attachEvent("onclick", ClickEventHandler);

            function ClickEventHandler()
            {
                // This closure refs element
            }
        }

        function SetupLeak()
        {
            // The leak happens all at once
            AttachEvents(document.getElementById("LeakedDiv"));
        }

        function BreakLeak()
        {
        }
        </script>
    </head\>

    <body onload="SetupLeak()" onunload="BreakLeak()">
        <div id="LeakedDiv"></div>
    </body>
</html>
If you are wondering how to break this leak, it won't be as easy as a normal circular reference. The "closure" can be viewed as a temporary object that exists in the function scope. Once the function exits, you lose reference to the closure itself, so what would you end up calling detachEvent with? One of the most interesting approaches to this problem was demonstrated on MSN spaces thanks to Scott Isaacs. The approach uses a second closure to additionally hook the window's onUnload event, and because this closure has the same "scoped" objects it is able to detach the event, detach itself, and finish the clean up process. To make everything easily fit with our model we can also store the closure on an expando, detach it, and then null the expando, as in the following example.
<html>
    <head>
        <script language="JScript">

        function AttachEvents(element)
        {
            // In order to remove this we need to put
            // it somewhere. Creates another ref
            element.expandoClick = ClickEventHandler;

            // This structure causes element to ref ClickEventHandler
            element.attachEvent("onclick", element.expandoClick);

            function ClickEventHandler()
            {
                // This closure refs element
            }
        }

        function SetupLeak()
        {
            // The leak happens all at once
            AttachEvents(document.getElementById("LeakedDiv"));
        }

        function BreakLeak()
        {
            document.getElementById("LeakedDiv").detachEvent("onclick",
                document.getElementById("LeakedDiv").expandoClick);
            document.getElementById("LeakedDiv").expandoClick = null;
        }
        </script>
    </head>

    <body onload="SetupLeak()" onunload="BreakLeak()">
        <div id="LeakedDiv"></div>
    </body>
</html>
In a Knowledge Base article, we actually recommend that you try not to use closures unless they are necessary. In the example, I've given we don't need to use a closure as the event handler, instead we can move the closure to a global scope. When the closure becomes a function, it no longer inherits the parameters or local variables from its parent function so we don't have to worry about closure-based circular references at all. Most code can be fixed by creating an architecture that doesn't rely on closures where they aren't necessary.
Finally, Eric Lippert, one of the developers of the scripting engines, has a great post on closures in general. His final recommendations are also along the lines of only using closures when truly necessary. While his article doesn't mention any of the workarounds for the closure pattern, hopefully we've covered enough examples here to get you started.
Cross-Page Leaks
Leaks that are based on order of insertion are almost always caused by the creation of intermediate objects that don't get cleaned up properly. That is exactly the case when creating dynamic elements and then attaching them to the DOM. The basic pattern is attaching two dynamically created objects together temporarily which creates a scope from the child to the parent element. Later, when you attach this two-element tree to the primary tree, they both inherit the scope of the document and a temporary object is leaked. The following diagram shows two methods for attaching dynamically created elements to the tree. In the first model, attach each child element to its parent, and finally attach the entire subtree to the primary tree. This method can cause leaks through temporary objects if other conditions are met. In the second model, we attach elements into the primary tree working our way from top-level dynamically created element down through all of the children. Because each attachment inherits the scope of the primary document we never generate temporary scopes. This method is much better at avoiding potential memory leaks.

Figure 3. DOM Insertion Order Leak Model
Next, we are going to cover an example of a leak that is transparent to most leak-detection algorithms. Because we don't leak any publicly visible elements and the objects we leak are very small you might never notice this problem. For our example to work, the dynamically created elements will have to contain a script pointer in the form of an inline function. This will allow us to leak an internal script object that is created temporarily as we attach elements together. Because the leak is small, we'll have to run thousands of samples. In fact, the objects leaked are only a few bytes. By running the sample and navigating to an empty page, you can see the difference in memory consumption between the two versions. When we use the first DOM model of attaching child to parent, then parent to the primary tree, our memory usage goes up a bit. This is a cross-navigation leak and the memory isn't reclaimed until you restart the IE process. If you run the sample a few more times, using the second DOM model of attaching the parent to the primary tree and then the child to the parent, your memory won't continue to climb and you'll find that you've fixed the cross-page navigation leak.
<html>
    <head>
        <script language="JScript">

        function LeakMemory()
        {
            var hostElement = document.getElementById("hostElement");

            // Do it a lot, look at Task Manager for memory response

            for(i = 0; i < 5000; i++)
            {
                var parentDiv =
                    document.createElement("<div onClick='foo()'>");
                var childDiv =
                    document.createElement("<div onClick='foo()'>");

                // This will leak a temporary object
                parentDiv.appendChild(childDiv);
                hostElement.appendChild(parentDiv);
                hostElement.removeChild(parentDiv);
                parentDiv.removeChild(childDiv);
                parentDiv = null;
                childDiv = null;
            }
            hostElement = null;
        }


        function CleanMemory()
        {
            var hostElement = document.getElementById("hostElement");

            // Do it a lot, look at Task Manager for memory response

            for(i = 0; i < 5000; i++)
            {
                var parentDiv =
                    document.createElement("<div onClick='foo()'>");
                var childDiv =
                    document.createElement("<div onClick='foo()'>");

                // Changing the order is important, this won't leak
                hostElement.appendChild(parentDiv);
                parentDiv.appendChild(childDiv);
                hostElement.removeChild(parentDiv);
                parentDiv.removeChild(childDiv);
                parentDiv = null;
                childDiv = null;
            }
            hostElement = null;
        }
        </script>
    </head>

    <body>
        <button onclick="LeakMemory()">Memory Leaking Insert</button>
        <button onclick="CleanMemory()">Clean Insert</button>
        <div id="hostElement"></div>
    </body>
</html>
This leak deserves clarification, because our workaround goes against some best practices in IE. The key points to understand about the leak are that DOM elements are being created with scripts already attached. This is actually crucial to the leak, because if we create DOM elements that don't contain any script and attach them together in the same manner we don't have a leak problem. This gives rise to a second workaround that might be even better for larger subtrees (in the example we only have two elements, so building the tree off the primary DOM isn't a performance hit). The second workaround would be to create your elements with no scripts attached initially so that you can safely build your subtree. After you've attached your subtree to the primary DOM, go back and wire up any script events at that point. Remember to follow the principles for circular references and closures so you don't cause a different leak in your code as you hook up your events.
I really wanted to point out this issue because it shows that not all memory leaks are easy to find. It could take thousands of iterations of a smaller pattern to become visible, and it might be something slight, like the order of insertion of DOM elements that causes the problem to arise. If you tend to program using only best practices, then you think you are safe, but this leak shows that even best practices can exhibit leaks. Our solution here was to improve upon the best practice or even introduce a new best practice in order to remove the leaking condition.
Pseudo-Leaks
Often times the actual behavior and expected behavior of some APIs can lead you to misdiagnose memory leaks. Pseudo-leaks almost always appear on the same page during dynamic scripting operations and should rarely be visible after navigation away from the page to a blank page. That is how you can eliminate the issue as a cross-page leak and then start to work on whether the memory consumption is expected. We'll use script text rewriting as our example of a pseudo-leak.
Like the DOM Insertion Order issue, this issue also relies on the creation of temporary objects in order to "leak" memory. By rewriting the script text inside of a script element over and over again, slowly you'll begin to leak various script engine objects that were attached to the previous contents. In particular, objects related to debugging script are left behind as are fully formed code elements.
<html>
    <head>
        <script language="JScript">

        function LeakMemory()
        {
            // Do it a lot, look at Task Manager for memory response

            for(i = 0; i < 5000; i++)
            {
                hostElement.text = "function foo() { }";
            }
        }
        </script>
    </head>

    <body>
        <button onclick="LeakMemory()">Memory Leaking Insert</button>
        <script id="hostElement">function foo() { }</script>
    </body>
</html>
If you run the above code and use the Task Manager trick again, while navigating between the "leaking" page and a blank page, you won't notice a script leak. This script leak is entirely within a page and when you navigate away then you get your memory back. The reason this one is bad is due to expected behavior. You expect that after rewriting some script that the original script won't stay around. But it really has to, because it might have been used already for event attachments and there might be outstanding reference counts. As you can see, this is a pseudo-leak. On the surface the amount of memory consumption looks really bad, but there is a completely valid reason.
Conclusion
Every Web developer builds a personal list of code examples that they know leak and learns to work around those leaks when they see them in code. This is extremely handy and is the reason the Web is relatively leak-free today. Thinking about the leaks in terms of patterns instead of individual code examples, you can start to develop even better strategies for dealing with them. The idea is to take them into account during the design phase and make sure you have plans for any potential leaks. Use defensive coding practices and assume that you'll need to clean up all your own memory. While this is an overstatement of the problem, you very rarely need to clean up your own memory; it becomes obvious which variables and expando properties have the potential for leaking.
In the interest of patterns and design I highly recommend Scott's short blog entry because it demonstrates a general purpose example of removing all closure-based leaks. It does require a bit more code, but the practice is sound and the improved pattern is easy to spot in code and to debug. Similar registration schemes can be used for expando-based circular references as long as care is taken that the registration method itself isn't riddled with leaks (especially where closures are used)!
About the authorJustin Rogers recently joined the Internet Explorer team as an Object Model developer working on extensibility and previously worked on such notable projects as the .NET QuickStart Tutorials, .NET Terrarium, and SQL Reporting Services Management Studio in SQL Server 2005.
출처 : http://blog.naver.com/PostView.nhn?blogId=bg_ellder&logNo=102838476


되는지 안되는지 모름.


var obj = func.test;
........................
obj = null; <== 참조가 끝났다면 자원을 수동으로 해제!.
==============================================================================
다음은 객체의 child들 까지도 자원을 해제 할 수 있도록 하는 function 모듈입니다.
(removeChild나 insertHTML등 전에 실행하지 않도록 주의하셔요.... 당연한거겠지만..^^)
function purge(d) {

    var a = d.attributes, i, l, n;

    if (a) {

        l = a.length;

        for (i = 0; i < l; i += 1) {

            n = a[i].name;

            if (typeof d[n] === 'function') {

                d[n] = null;

            }

        }

    }

    a = d.childNodes;

    if (a) {

        l = a.length;

        for (i = 0; i < l; i += 1) {

            purge(d.childNodes[i]);

        }

    }

}CREATE GLOBAL TEMPORARY TABLE FOO
(
C1 VARCHAR2(8 BYTE),
C2 VARCHAR2(8 BYTE),
C3 CLOB
)
;
INSERT INTO FOO SELECT * FROM 스키마마명.테이블명@링크명 WHERE 절 ;
SELECT * FROM FOO;
COMMIT 하면 안됨.
su - o~
[/oracle/app/oracle/product/920/network/admin]$vi tnsnames.ora
수정
/* 오라클 tns 중지*/
[/oracle/app/oracle/product/920/network/admin]$lsnrctl stop
/* 오라클 tns 시작*/
[/oracle/app/oracle/product/920/network/admin]$lsnrctl start
/* 오라클 tns 구동여부 체크*/
[/oracle/app/oracle/product/920/network/admin]$ps -ef | grep lsnr*
oracle xxxx 1 0 11:11:54 pts/2 0:00 /oracle/app/oracle/product/920/bin/tnslsnr LISTENER -inherit
oracle xxxx xxx 0 11:12:02 pts/2 0:00 grep lsnr*
http://kangcom.com/sub/view.asp?sku=201106140003
(아래 부분은 직접 타이핑 한것 입니다;)
프록시 : 자신이 클라이언트가 사용하려고 하는 실제 대상인 것처럼 위장해서 클라이언트의 요청을 받아준다.
대리자, 대리인과 같은 역할을 한다고 해서 프록시(proxy)라고 부른다.
프록시의 특징은 타깃과 같은 인터페이스를 구현햇다는 것과, 프록시가 타깃을 제어할 수 잇는 위치에 있다는 것이다.
프록시는 사용목적에 따라 두 가지로 구분할수 있다.
a)클라이언트가 타깃에 접근하는 방법을 제어하기 위함(--> 프록시 패턴)
b)타깃에 부가적인 기능을 부여해주기 위함.(--> 데코레이터 패턴)
데코레이터 패턴: 타깃에 부가적은 기능을 런타임시(Runtime)시 다이내믹하게 부여해주기 위해 프록시를 사용하는 패턴
프록시 패턴:
프록시 패턴의 프록시는 타깃의 기능을 확장하거나 추가히지 않는다.
대신 클라이언트가 타깃에 접근하는 방식을 변경해준다.
타깃의 기능 자체에는 관여하지 않으면서 접근하는 방법을 제어해주는 프록시를 이용하는 것이다.
(따라서 프록시 패턴의 프록시는 코드에서 자신이 만들거나 접근할 타깃의 구체적인 클래스 정보를 알고 있는 경우가 많다.)
요약:
프록시 : 클라이언트와 사용 대상 사이에 대리 역할을 맡은 오브젝트를 두는 방법을 총칭
데코레이터 패턴 : 타깃에 부가적인 기능을 부여해주기 위해 프록시를 사용하는 패턴.
프록시 패턴 : 타깃에 대한 접근 방법을 제어하려는 목적을 가지고 프록시를 사용하는 패턴.
서브 출처 : http://blog.naver.com/ypark197?Redirect=Log&logNo=90093937410
AOP(Aspect Oriented Programming) in Java - Part I
Enterprise Java 환경에서 최근 가장 주목받는 기술 중 하나는 AOP, 즉 Aspected Oriented Programming 이다. AOP가 주목받는 이유는 Enterprise Java 시스템이 맞닥뜨리고 있는 복잡성때문이다.
(AOP의 정의에 대해서는 Wikipedia를 참조하기 바란다)
AOP는 전통적인 객체 지향의 프로그래밍(Object Oriented Programming. 이하 OOP)이 실패한 곳에서 진가를 발휘한다. OOP 언어들은 견고한 철학과 다양하고 유연한 프로그래밍 기법, 다양한 패턴들의 체계화등을 제공한다. 프로그래머들은 이로 인해 절차식 프로그래밍 언어들을 사용할 때에 비해 훨씬 직관적이고 체계적이고 모듈화된 구현을 할 수 있게 되었다. 만세!!!
하지만,불행히도 OOP 언어가 해결하지 못하는 몇가지 중요한 문제점들이 대두되었다.
가장 간단하고 직관적인 예로 로깅(Logging) 기능을 생각해 보자. OOP 언어의 대표격인 Java에서의 전통적인 Logging 구현 방법은 다음과 같다.
public class OrderManager {
public void orderItem(OrderItem oi) {
Logger log = Logger.getLogger("order");
log.info("orderItem started...");
// do something
try {
doSomething(oi);
} catch(Exception ex) {
log.info("Error : " + ex.getMessage());
} finally {
log.info("orderItem finished...");
}
}
Logger라는 객체를 이용해서 로깅 기능을 잘 모듈화했지만, 실제 이 객체를 사용하다보면 몇가지 심각한 문제를 만나게 된다.
- 로직을 구현하는 핵심 소스에 많은 수의 로깅 관련 소스가 삽입됨으로써 소스의 가독성과 간결함을 심하게 훼손한다.
- 로깅을 남기는 방법이나 시점, 위치 등을 바꾸려면 거의 모든 소스파일을 변경해야 한다.
위와 같이 "어떻게 하면 로깅을 남기는 기능을 핵심 로직과 무관하게 구분해서 구현할 수 있을까"라는 간단하고 명확한 요구에 대해 OOP는 적절한 대답을 하지 못한다.여기가 AOP가 개입되는 부분이다.
AOP는 객체를 프로그래밍 단위로 하지 않고, 특정 사건의 발생 양상(또는 상황/국면)을 프로그래밍의 단위로 한다. 이런 의미에서 AOP를 한글로 번역하자면상황 지향 프로그래밍이 가장 적절한 것으로 생각된다.
위의 로깅 예제에서는 다음과 같은 상황들이 펼쳐진다.
- orderItem 메소드가 시작하는 상황에 로그를 기록하라.
- orderItem 메소드가 끝나는상황에 로그를 기록하라.
- orderItem 메소드내에서 Exception이 발생하는 상황에 로그를 기록하라.
AOP에서는 위의 상황들을 정의할 수 있고, 이런 상황이 발생했을 때 수행할 작업을 정의할 수 있다. 즉, 핵심 로직과 무관하게 핵심 로직을 수행하는 과정에서 발생하는 상황들을 적절하게 다룰 수 있다.
Java AOP의 대표적인 언어인 AspectJ를 이용하면위의 소스를 다음과 같이 변경할 수 있다.
// 놀랍게도 핵심 로직에서는 Logging 관련된 부분이 완전히 제거된다.
public class OrderManager {
public void orderItem(OrderItem oi) {
// do something
try {
doSomething(oi);
} catch(Exception ex) { }
}
// 핵심 로직에서 발생하는 상황에 대한 로직을 구현한다.
public aspect LoggingAspect {
// OrderManger내에서 발생하는 모든 Method Call에 대해
pointcut methodExec() :
call(* *.*(..)) &&within(OrderManager);
//Method Call 시작시수행할 일
before() : methodExec() {
Logger log = Logger.getLogger("order");
log.info(thisJoinPointStaticPart.getSignature() + " started...");
}
//Method Call 종료시 수행할 일
after() returning : methodExec() {
Logger log = Logger.getLogger("order");
log.info(thisJoinPointStaticPart.getSignature() + " finished...");
}
// Exception 발생시
after() throwing(RuntimeException ex) : methodExec() {
Logger log = Logger.getLogger("order");
log.info("Error : " + ex.getMessage());
}
}
위와 같이 AOP를 이용하면 로깅과 같은 Aspect라는 이름으로 비핵심 로직을 핵심 로직에서 완전히 분리할 수 있으며, 이후 로깅과 관련된 변경 사항은 핵심 로직을 담당하는 소스의 변경이 아닌 Aspect의 변경만으로 이루어진다.
지금까지 AOP의 등장 배경에 대해 간략하게 살펴보았다. 다음 글을 통해 AOP의 개념 및 AOP의 대표 구현체인 AspectJ에 대해 좀 더 상세하게 논의해보자.
AOP의 개념 - part2
AOP에서는 위와 같이 핵심 로직 구현에서 부가적으로 처리해야 하는 작업들을 Concern(걱정/관심)이라고 부른다. Concern의 특징은 핵심 로직을 구현하는 여러 객체들에 걸쳐져 있다는 것이다. 가령 로깅 Concern은 핵심 로직을 구현하는 모든 객체와 관련되어 있다. 이런 의미에서는 흔히 Cross-cutting Concern이라는 용어를 쓴다. 우리말로 번역하면 "횡단-절단 관심" 정도가 될 것이다.
그림으로 표현하면 아래와 같지 않을까...?

즉 AOP는 객체가 구현하는 핵심 로직에 존재하는 여러 가지 Concern(관심거리, 혹은 걱정거리)을 구현하기 위한 프로그래밍 방법론으로 이해할 수 있다. 핵심 로직을 수행하는 과정에서 발생하는 로그 기록이라는 걱정 거리, 데이터베이스와의 통신 과정에서 발생하는 트랜잭션 관리라는 걱정 거리, 핵심 로직을 수행하는 과정에서 발생하는 성능을 측정하고자 하는 걱정 거리 등... 여러 객체와 행위를 관통하는(Cross-cutting)하는 걱정거리를 보다 손쉽게 구현하고자 하는 것이 바로 AOP의 핵심인 것이다.
AOP의 용어
AOP에 대해 더 상세하게 논의하기 전에 AOP에서 사용하는 용어에 대해 간략하게 정리해보자. 용어를 정확하게 이해해야만 AOP의 기법을 이해할 수 있다.
(정확하게 말하면 아래 용어는 AOP의 용어가 아니라 AspectJ의 용어이다. 하지만 AspectJ가 AOP의 사실상의 표준이기 때문에 무방하다고 간주한다)
- joinpoint : 프로그램 수행 과정에서의 특정 지점. 생성자의 호출, 메소드의 호출, 오브젝트 필드에 대한 접근 등의 대표적인 joinpoint들이다.
- pointcut : joinpoint와매칭하고자 하는 조건과 그 상황에서의 값들
- advice : pointcut에 의해매칭된 joinpoint에서 실행할 작업
- aspect : pointcut과 advice의 집합체. 즉 특정 상황(pointcut)과 그 상황에서 수행할 작업(advice)의 집합
- weaving : aspect과 핵심 로직을 섞는(weave) 것을 의미
이를 그림으로 표현하면 다음과 같다.

- 컴파일시 Weaving : Java/AspectA 소스파일을 컴파일하는 시점에 Weaving을 수행
- 로딩타임시 Weaving: Java Class 파일을 ClassLoader에 의해 로딩하는 시점에 Weaving을 수행
다음으로 계속...
AspectJ - part3
AspectJ는 Java에서의 AOP 언어의 사실상의 표준이다. Spring AOP, JBoss AOP 등 새로운 AOP 컴포넌트들이 있지만, 모두 AspectJ의 서브셋으로 보아도 무방할 것이다.
AspectJ의 특징과 역사는 Wikipedia에 잘 기술되어 있다. (고맙게도 ...)
현재 AspectJ은 Eclipse Project의 서브 프로젝트로 관리되고 있으며, IBM 영국 연구소의 개발자들이 핵심 멤버로 활동하고 있다. 따라서 Eclipse가 계속 존재하는 한, AspectJ 또한 계속 유지보수가 이루어질 것을 기대할 수 있다. ^^
AspectJ는 1.5 이후에 큰 변화를 겪었는데, 바로 AspectWerkz라는 이름의 AOP 프로젝트를 흡수한 것이다. 이 흡수로 인해 AspectJ는 1) 로드타임시 Weaving(Load Time Weaving. LTW) 지원, 2) Java 5 스타일의 Annotation 지원이라는 새롭고 강력한 특징을 가지게 되었다.
이 중, 특히 LTW 기능에 주목할 필요가 있다. 이전 버전의 AspectJ에서는 반드시 AspectJ가 제공하는 컴파일러를 이용해 사용자가 작성한 Class 파일이나 Jar 파일에 대해 Weaving 작업을 수행해야 했다. 한 프로젝트에서 모든 소스를 다 스스로 작성하는 경우는 모르겠지만, 다른 써드 파티가 제공하는 라이브러리를 사용하는 경우에는 확실히 번거로운 점이 있다.
LTW 기능을 이용하면 사용자의 Class 파일을 로딩하는 시점에(즉 실행시) Aspect를 Class와Weaving할 수 있다. 따라서 별도의번거로운 컴파일 과정을 거치지 않아도된다.
하지만!!! 속도 면에서는 컴파일시Weaving이 더유리할 수 있다는 점만은 기억해두자.특히 프로그램 실행 초기에 클래스가 로딩되는 속도가 눈에띄게느려질 수 있다는 점은 기억해둘 필요가 있다.
AspectJ 다운받고 사용하기
AspectJ는 http://www.eclipse.org/aspectj/index.php에서 다운받을 수 있다. 다음 두가지를 다운받아야 한다.
- AspectJ 1.5.3 - AspectJ 메인 릴리즈
- AJDT - AspectJ Development Tools. Eclipse Project내에서 AspectJ를 사용할 수 있는 플러그인을 제공
AJDT를 사용하면 Eclipse의 풍부한 기능과 함께 비주얼하게 AspectJ를 사용할 수 있으므로 보다 손쉽게 AspectJ에 접근할 수 있다.
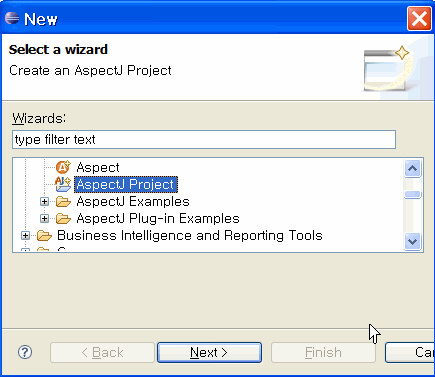
AJDT를 설치하고 나면, 아래 그림과 같이 AspectJ를 기본으로 하는 프로젝트와 Aspect를 손쉽게 생성할 수 있다.
<< AspectJ 프로젝트 생성>>

<< Aspect 생성>>

다음 파트에서 AJDT를 이용해 간단한 AOP 샘플을 구현할텐데, 다음과 같은 Concern을 해결하는 것을 목표로 한다.
" 현재 운영 중인 시스템에서 코드상의 오류로 인해 Exception이 계속해서 발생한다. Exception이 발생할 때마다 발생한 Exception을 파악하고, Exceptioon의 발생 시점, 발생 이유, 발생 시의 Stack Trace 등을 기록하고자 한다."
즉, Exception 처리라는 걱정 거리를 좀 더 효과적으로 처리할려고 한다. 언뜻 어려워 보이는 이 걱정거리가 AOP에서는 얼마나 쉽게 해결가능한지 살펴보게 될 것이다.
AspectJ에서 Concern 구현 하기 - part4
아래에 심플한(?) 비지니스 로직을 구현하는 객체가 있다. 우리의 걱정 거리는 비지니스 로직에서 Exception이 발생할 때마다 상세한 발생 상황을 기록하는 것이다.
우리의 비지니스 로직은 다음과 같다.

이 비지니스 로직에 대한 우리의 Concern을 처리해야 하는 상황은 다음과 같다.
- ExceptionGenerator의 로직을 수행하는 과정에서 Exception이 발생하면 이것을 캡쳐해서 기록하고 싶다.
- 이 때 어떤 메소드를 호출하다가 Exception이 발생했는지, Exception의 종류는 무엇인지 등의 정보가 종합적으로 기록하고 싶다.
이 상황을 AOP 없이 처리하려면 제 아무리 자바의 고수라고 하더라도 다음과 같은 방식으로 일일이 소스를 변경해야 한다.
try { doSomething1() } catch(Exception ex) {
logger.log("Error " + ex + " occurred when executing ExceptionGenerator.doSomething1()...");
}
비록 Java Logging API나 Log4j 같은 라이브러리들이 이러한 작업을 처리하는데 상당히 도움이 되지만, 핵심 로직안에 우리의 Concern을 처리하는 로직을 넣어야 한다는 기본적인 사실에는 전혀 변화가 없다.
하지만, AspectJ를 사용하면... ? 핵심 로직에는 Exception Handling에 관련된 소스를 전혀 추가할 필요없이 다음과 같은 형태의 Aspect만을 만들어주면 된다.
Exception Aspect Version 1

매우 심플한 Aspect지만 두 가지의 핵심적인 정보를 담고 있는 완전한 형태의 Aspect이다.
- pointcut : 모든객체의 메소드콜을 횡단으로 매치시키는 call (* *.*(..)) 이라는 pointcut이 callpoint라는 이름으로 정의되어 있다.
- after advice : callpoint pointcut에서 Exceptoin이 발생한 이후(after + throwing) 수행할 advice가 정의되어 있다.
AspectJ에서는 대부분의 Concern이 pointcut과 advice의 조합으로 이루어진다. 즉 어떤 지점(pointcut)에서 어떤 일(advice)를 수행할 지가 바로 AspectJ가 구현하는 Concern에 대한 해결책이 된다.
위의 ExceptionAspect와 ExceptionGenerator를 Weaving해서 수행하면 다음과 같은 결과가 나온다.

결과1

이제 ExceptionAspect를 좀 더 다듬어서 보다 완전한 형태의 정보를 얻을 수 있도록 해보자.
Exception Aspect Version 1

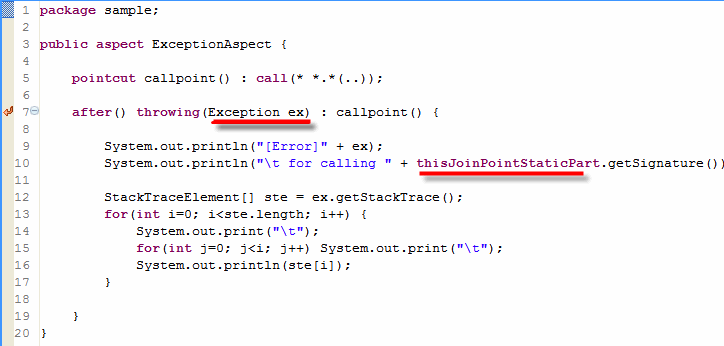
더욱 세련된 모양의 Aspect가 구현되었음을 확인할 수 있다. Version 1에 비해 다음과 같은 특징들이 추가되었다.
- After advice에서 Exception발생시 Exception 객체를 받는다. 이렇게 받은 객체를 이용해서 필요한 정보를 추출한다.
- thisJoinPointStaticPart (또는 thisJoinPoint.getStaticPart())를 이용해 어떤 지점에서 발생한 Exception인지를 알아낸다.
위의 Aspect를 보고 "아... 정말 내가 원하던 방법론이다"라고 감탄을 했다면 이미 일류 프로그래머이거나 일류 프로그래머가 될 잠재력을 가지고 있는 사람일 것이다.
AspectJ 혹은 AOP를 현재 프로젝트에 사용하고 싶은 욕구가 이는가...!!!
AspectJ의 Load Time Weaving - part5
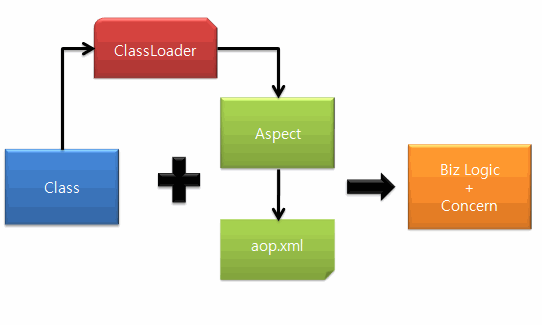
ApsectJ 1.5는 AspectWerkz라는 신흥 AOP 컴포넌트를 흡수하면서 Load Time Weaving 기능을 크게 향상시켰다. Load Time Weaving이란 말 그대로 클래스가 로드되는 시점에 Weaving 작업을 수행하는 것을 의미한다.
전통적으로 AspectJ에서는 ajc(AspectJ Compiler)라는 컴파일러를 사용해서 사용자가 작성한 Class 파일이나 Jar 파일을 컴파일 시간에 Weaving하는 방식을 지원했다. 비록 이 방법이 아직까지도 가장 보편적이고 또 편리한 방법이긴 하지만, 컴파일시 Weaving은 역시 불편한 방법이다. 하지만!!! 성능 면에서는 가장 유리한 방법이라는 것은 다시 한번 염두에 두자
AspectJ에서 Load Time Weaving이 적용되는 방식은 아래 그림과 같다.

aop.xml
aop.xml 파일은 LTW의 룰을 지정하는 역할을 한다. 즉 어떤 Aspect를 어떻게 Weaving 할 것인지 지정할 수 있다.

아래에 aop.xml의 간단한 예제가 있다.
위의 aop.xml 파일은[aop.ltw.SimpleLTWAspect]라는 이름의 Aspect를 사용하며, 이 Aspect를 이용해서 Weaving을 수행할 것을 지정한다.
AspectJ의 LTW 모듈은 [클래스패스(Classpath)/META-INF]에 있는 모든 aop.xml 파일을 불러와서 Weaving 작업을 수행한다.
aop.xml이 제공하는 문법은 매우 다양하고 강력하다. 어떤 Aspect를 어떤 타겟(비지니스 로직)에 대해 어떤 조건(pointcut)으로 사용할지를 자유롭게 지정할 수 있다. 예를 들어 Abstract Aspect를 만든 후 aop.xml에서pointcut을 정의할 수도 있다. aop.xml을 사용하는 상세한 방법은 AspectJ Manual을 참조한다.
LTW의 간단한 예제
아래에 간단한 Aspect가 있다.

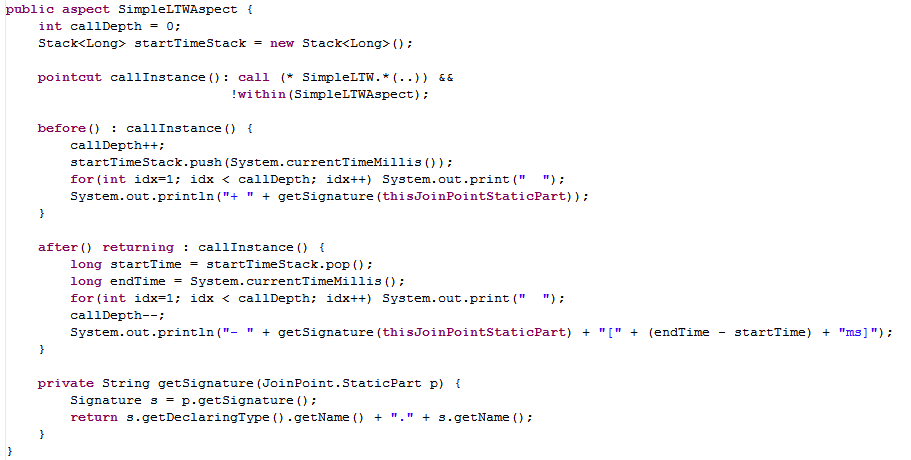
이 Aspect의 역할은 Method의 시작과 끝을 잡아서 수행 시간을 측정하는 것이다. 어플리케이션 성능 측정을 위한 가장 기본적인 기능을 구현할 것이라고 볼 수 있다.
이 Aspect를 다음과 같이 ajc를 이용해서 컴파일한다.
c:aspectj1.5binajc -1.5 -cp ../..;c:aspectj1.5libaspectjrt.jar SimpleLTWAspect.aj
컴파일에 성공하면 SimpleLTWApsect.class 파일이 생긴다. 이 Aspect 파일과 위에서 샘플로 사용한 aop.xml 파일을 이용해서 LTW을 수행하는 명령어는 다음과 같다.
(SimpleLTW 객체는 몇 개의 메소드를 반복적으로 호출하는 단순한 객체이다)
java -javaagent:aspectjweaver.jar -cp ../.. aop.ltw.SimpleLTW
아래 결과를 보면 우리가 원하는 대로 각 메소드를 실행하는데 걸린 시간이 계산되어 나오는 것을 알 수 있다.

위에서 본 간단한예제만으로도 AspectJ에서 제공하는 LTW의 유연함과 강력함을 느낄 수 있으리라 믿는다.
PS)
Java 5 (JDK 1.5)부터는 java.lang.instrument 패키지를 이용해서 Byte Code Instrumentation(BCI)을 직접적으로 지원한다. 더 이상 BCI가 어둠의 자식이 아니라는 것을 의미한다.오히려 BCI가 Sun에서도 인정하는 보편적인 방법론임을 의미한다.
자연스럽게, AspectJ 1.5의 LTW도 이 기능을 이용한다. 위의 예에서 "-javaagent:aspectjweaver.jar" JVM 옵션이 java.lang.instrument 패키지를 이용한다는 것을 의미한다. 즉, aspectjweaver.jar 내에 클래스 로드 타임시 실시간으로 클래스를 Weaving하는 기능을 제공하는 Class Transformer가 존재한다.
JDK 1.4에서는 VM 레벨에서 BCI가 지원되지 않는다.JDK 1.4라면 아래와 같은 형식으로 사용가능하다.
java -classpath[aspectjweaver.jar]
-Djava.system.class.loader=org.aspectj.weaver.loadtime.WeavingURLClassLoader
-Daj.class.path=. -Daj.aspect.path=.[YourClass]
또는 JRockit에서는 다음과 같은 JVM옵션을 사용할 수 있다.
-Xmanagement:class=org.aspectj.weaver.loadtime.JRockitAgent
AOP(Aspect Oriented Programming) in Java - Part 6
AOP와 AspectJ를 이용해서 할 수 있는 일은 실로 무궁구진하다.
비지니스 로직을 처리하는 과정에서 발생하는 관심거리나 걱정거리를 좀 더 효율적이고 체계적으로 처리하고자 한다면 AOP가 바로 대답이다.
AOP를 이용해서 구현 가능한 몇 가지 사례를 끝으로 AOP에 관한 블로깅을 끝맺기로 한다.
- 로깅 : 각 조인포인트마다 적절한 로그를 남길 수 있다.
- 프로파일링 : 각 조인포인트마다 수행되는 메소드 정보를 기록해서 프로파일링을 구현할 수 있다. 가령 자바 어플리케이션에서 수행되는 모든 메소드에 대해 수행 시간을 측정하고자 한다면 AOP의 before/after/around advice를 이용해서 손쉽게 구현할 수 있다.
- 트랜잭션 관리 : 트랜잭션 관리에 관련된 모는 기능을 비지니스 로직에서 제거하고 AOP로 구현할 수 있다. EJB는 AOP의 개념을 사용하지 않고 EJB 컨테이너를 이용해서 트랜잭션을 관리하는 기능을 제공하는 것으로 이해할 수 있다. 반면 Spring과 같은 경량 프레임웍들을 EJB 컨테이너와 같은 무거운 방법대신 AOP를 사용해서 사용자가 작성한 비지니스 로직에 트랜잭션 관리에 필요한 Bytecode를 직접 삽입하는 방식을 사용한다.
- 코딩컨벤션 관리:클 래스의 필드명을 항상 m_ 로 시작하게끔 규칙을 부여한다고 하자. 여러 명의 개발자들이 개발을 진행할 경우 이 규칙이 지켜지기는 거의 불가능하다. 하지만 AOP의 필드 조인트포인트를 이용하면 컴파일 시점에 이러한 오류들을 모두 걸러낼 수 있다. AOP를 이용하면 매우 복잡한 코딩 컨벤션 관리를 거의 자동화 할 수 있다.
- 기타 등등... 오직 우리의 상상력에 의해서만 제약을 받는다!!!
국내 개발 프로젝트에서 AOP를 많이 사용하지 않는다고 해서 AOP가 무용하거나 현실과 동떨어진 것이라고 생각한다면 큰 오산이라는 것을 다시 한번 명심하자.
Spring 프레임웍이 내부적으로 트랜잭션 관리를 위해 AOP를 사용하고 있다. 따라서 여러분이 만일 Spring을 사용하고 있다면 이미 AOP를 사용하고 있는 것이다. 그 외에도 대부분의 Application Server가 AOP를 이용해 사용자가 작성한 클래스 파일에 특정 기능을 부여하는 기능을 곳곳에서 사용하고 있다.
앞서 다섯 편의 글을 통해 AOP의 강력함과 편리함을 조금이라도 느낄 수 있었기를 바라며, 국내의 개발 프로젝트에서 AOP를 사용하는 실제적인 사례를 목격하게 되기를 바래 본다.
출처 : http://www.oracleclub.com/lecture/1148
Ampersand나 특수 문자를 갖는 데이타를 insert하는 방법
-- 테스트 테이블 생성
SQL> CREATE TABLE test_str(
        val varchar2(10)
     );


-- 테이블에 아래와 같이 특수문자를 인서트 할경우
SQL> INSERT INTO test_str VALUES('Q&A');
a의 값을 입력하십시오:
-- 이런 문장이 나옵니다..
-- 특수문자를 갖는 데이터를 인서트 하기 위해서는
-- 다음과 같은 세 가지 해결 방법이 있습니다.
SET DEFINE OFF
-- SQL*Plus에서 SET DEFINE OFF나 SET SCAN OFF를 실행하여
-- Substitution Variable(&)을 Turn Off시킨다.

SQL> SET DEFINE OFF
SQL> INSERT INTO test_str VALUES('Q&A');

SQL> SELECT * FROM test_str;
     VAL
     ------
     Q&A
SET DEFINE %
-- SET DEFINE ON 상태로 유지 시키면서 Substitution Variable을
-- 다른 Non-Alphanumeric 문자나 Non-White Space 문자(*, % 등등)로
-- 대체시킨다.

SQL> SET DEFINE %
SQL> INSERT INTO test_str VALUES('Q&A');
SET ESCAPE ON
-- SET ESCAPE ON 상태에서(DEFINE은 &로, SCAN은 ON 상태로 유지)
-- 특수 문자 앞에 ESCAPE 문자인 BACKSLASH('\')를 붙인다.

SQL> SET ESCAPE ON
SQL> SHOW ESCAPE
     ESCAPE "\" (hex 5c)
SQL> INSERT INTO test_str VALUES ('Q\&A');
try {
var st = document.getElementById("contentFrame");
var iframeHeight= i.contentWindow.document.body.scrollHeight;
var iframeWidth= i.contentWindow.document.body.scrollWidth;
(i).height=iframeWidth+20;
(i).height=iframeHeight+20;
} catch (e) {
var st = document.getElementById("contentFrame");
var iframeHeight= st.document.body.scrollHeight;
var iframeWidth= st.document.body.scrollWidth;
st.height=iframeWidth+20;
st.height=iframeHeight+20;
}
import java.io.BufferedReader;
import java.io.InputStream;
import java.io.InputStreamReader;
public class Test1 {
public static void main(String args[]) {
Test1.getDiskSpace();
}
//서버의 쉘(UNIX) 또는 배치파일(WINDOW) 실행결과 가져오기
public static void getDiskSpace() {
try {
Process ps = Runtime.getRuntime().exec("d:/temp/view_direcotory.cmd");
InputStream is = ps.getInputStream();
InputStreamReader reader = new InputStreamReader(is);
BufferedReader in = new BufferedReader(reader);
StringBuffer sBuffer = new StringBuffer();
char[] buf = new char[1024];
int readcnt;
while((readcnt = in.read(buf,0,1024)) !=-1)
{
sBuffer.append(buf, 0, readcnt);
}
in.close();
reader.close();
System.out.println(sBuffer.toString());
ps.destroy();
}
catch(Exception e) {
e.printStackTrace();
}
}
}
<wls:container-descriptor>
<wls:servlet-reload-check-secs>3</wls:servlet-reload-check-secs>
<wls:resource-reload-check-secs>-1</wls:resource-reload-check-secs>
<wls:prefer-web-inf-classes>true</wls:prefer-web-inf-classes>
</wls:container-descriptor>
참고자료 : http://blog.anyframejava.org/?p=264
<IfModule dir_module>
DirectoryIndex index.html index.jsp
</IfModule>
httpd.conf 의 제일 마지막에 추가.
# 웹로직 연동
# 1. 모듈 추가
LoadModule weblogic_module C:\bea\wlserver_10.0\server\plugin\win\32\mod_wl_22.so
# 2. 웹로직 포트 연동및 기타 연동
<IfModule mod_weblogic.c>
WebLogicCluster localhost:7001
ConnectTimeoutSecs 30
ConnectRetrySecs 10
DynamicServerList OFF
Idempotent OFF
MatchExpression *.jsp
MatchExpression *.xxx
MatchExpression *.yyy
MatchExpression *.ddd
MatchExpression /DDDD/XXX/*
MatchExpression /DDDD/FFFFF
Alias /DDDD/ "D:/폴더/하위폴더/WebContent/"
<Directory "D:/폴더/하위폴더/WebContent/">
Options Indexes FollowSymLinks MultiViews ExecCGI
AllowOverride None
Order allow,deny
Allow from all
</Directory>
</IfModule>
웹로직에서는 자체 Log4J 가 있기 때문에 별도 설정이 필요하다
override 하면 될것을...-_-;;
org.apache.log4j.PropertyConfigurator.configure(logPath); 이것으로 하단에 참조...
http://payoff.tistory.com/27
http://blog.naver.com/dalbong97/130021029647
1. log4j란?
log4j는 프로그래머가 로그문의 출력을 다양한 대상으로 할 수 있도록 도와주는 도구이다.
애플리케이션에 문제가 생겼을 때, 로깅을 활성화하면 문제의 위치를 찾을 수 있으므로 도움이 된다.
log4j를 사용하면 애플리케이션의 실행코드를 수정하지 않고 런타임에 로깅의 활성화를 할 수 있다.
log4j 패키지는 성능상의 높은 비용을 들이지 않으면서도 배포코드에 로그문장을 남겨놓을 수 있도록 디자인되었다.
그러므로 로깅의 속도(정확히 말하자면 로깅을 하지 않을 때의 속도)가 중요하게 다루어졌다.
동시에 로그 결과는 짧은 시간에 감당하기 어렵게 될만큼 커질 수 있다.
log4j의 독특한 특징 중 하나는 계층적 로거라는 개념이다.
로거를 사용하면, 어떤 로그문이 출력되게 할 지 임의의 단위로 조정할 수 있다.
2. log4j 구성
- Logger(Category)
로깅 메세지를 Appender에 전달합니다.
- Appender
전달된 로깅 메세지를 파일에다 기록할 것인지, 콘솔에 출력할 것인지 아니면 DB에 저장할 것인지 매개체 역활을 합니다.
- Layout
Appender가 어디에 출력할 것인지 결정했다면 어떤 형식으로 출력할 것이지 출력 layout을 결졍합니다.
3. log4j 로깅 레벨
로깅의 우선 순위에 따른 로깅 레벨이다.
FATAL > ERROR > WRN > INFO > DEBUG
① FATAL : 가장 크리티컬한 에러가 일어 났을 때 사용합니다.
② ERROR : 일반 에러가 일어 났을 때 사용합니다.
③ WARN : 에러는 아니지만 주의할 필요가 있을 때 사용합니다.
④ INFO : 일반 정보를 나타낼 때 사용합니다.
⑤ DEBUG : 일반 정보를 상세히 나타낼 때 사용합니다.
만약 현재 요청한 로깅의 우선순위가 카테고리의 우선순위와 같거나 높으면
그 로깅 요청이 가능하다고 말한다.
그렇지 않을 경우 그 요청은 불가능하다고 한다.
다음은 로깅 요청의 가능/불가능 여부가 어떻게 처리되는 지를 보여주는 예이다.
// 이름이 "com.foo"인 카테고리 인스턴스를 구한다.
Category cat = Category.getInstance("com.foo");
// 카테고리의 우선순위를 설정한다.
cat.setPriority(Priority.INFO);
// WARN >= INFO 이기 때문에, 이 요청은 가능하다.
cat.warn("Low fuel level.");
// DEBUG < INFO 이기 때문에, 이 요청은 불가능하다.
cat.debug("Starting search for nearest gas station.");
// 이름이 "com.foo.Bar"인 카테고리의 인스턴스를 생성한다.
// 이 카테고리는 이름이 "com.foo"인 카테고리를 상속 받는다.
// 따라서 이 카테고리 인스턴스는 INFO 우선순위를 갖는다.
Category barcat = Category.getInstance("com.foo.Bar");
// INFO >= INFO 이므로, 이 요청은 가능하다.
barcat.info("Located nearest gas station.");
// DEBUG < INFO 이므로, 이 요청은 불가능하다.
barcat.debug("Exiting gas station search");
4. log4j 설정
log4j 설정은 프로그램 내에서 할 수 있지만 설정파일을 사용함으로서 좀더 유연하게 log4j환경을 만들 수 있습니다.
① 프로그램에서 설정
| <%@ page contentType="text/html;charset=MS949" import="org.apache.log4j.*,java.io.* " %> <%! <% PatternLayout patternlayout = new PatternLayout(layout); |
② property 파일에 설정
설정 파일의 위치를 별도로 지정하지 않으려면, log4j.properties를 만들어 /WEB-INF/classes 밑에 놓으세요.
* log4j.properties 파일은 /WEB-INF/classes/ 하위에 있어야 자동으로 load 됨.
|
log4j.rootLogger=INFO, stdout, rolling log4j.appender.stdout=org.apache.log4j.ConsoleAppender log4j.appender.stdout.layout=org.apache.log4j.PatternLayout log4j.appender.stdout.layout.ConversionPattern=%d %-5p [%t] %-17c{2} (%13F:%L) %3x - %m%n log4j.appender.rolling=org.apache.log4j.DailyRollingFileAppender log4j.appender.rolling.File=output.log log4j.appender.rolling.Append=true log4j.appender.rolling.MaxFileSize=500KB log4j.appender.rolling.DatePattern='.'yyyy-MM-dd log4j.appender.rolling.layout=org.apache.log4j.PatternLayout log4j.appender.rolling.layout.ConversionPattern=%d %-5p [%t] %-17c{2} (%13F:%L) %3x - %m%n
|
#최상위 카테고리에 INFO로 레벨 설정 및 appender로 stdout, rolling을 정의
log4j.rootLogger=INFO, stdout, rolling
#stdout 어펜더는 콘솔에 뿌리겠다는 정의
log4j.appender.stdout=org.apache.log4j.ConsoleAppender
#stdout 어펜더는 patternlayout을 사용하겠다는 정의
log4j.appender.stdout.layout=org.apache.log4j.PatternLayout
#페턴은 다음과 같이 포맷팅 하겠다는 것을 정의
log4j.appender.stdout.layout.ConversionPattern=%d %-5p [%t] %-17c{2} (%13F:%L) %3x - %m%n
#역시나 rolling 어펜더는 파일로 처리한다라고 정의
log4j.appender.rolling=org.apache.log4j.DailyRollingFileAppender
#로그 파일 이름은 output.log
log4j.appender.rolling.File=output.log
#true면 톰캣을 내렸다 올려도 파일이 리셋되지 않습니다.
log4j.appender.rolling.Append=true
#파일 최대 사이즈는 500KB로 설정
log4j.appender.rolling.MaxFileSize=500KB
#파일 포맷은 output.log.2005-03-10 으로 관리하겠다고 정의
log4j.appender.rolling.DatePattern='.'yyyy-MM-dd
#역시나 rolling 어펜더는 패턴 레이아웃을 사용하겠다고 정의
log4j.appender.rolling.layout=org.apache.log4j.PatternLayout
#rolling 어펜더는 패턴 레이아웃 포맷
log4j.appender.rolling.layout.ConversionPattern=%d %-5p [%t] %-17c{2} (%13F:%L) %3x - %m%n
특정 위치의 설정파일을 지정하는 방법
1. WAS 기동 옵션으로
-Dlog4j.configuration=file:D:\StandardPrj\StandardProject\WebContents\WEB-INF\classes\log4j.properties
2. web.xml 파일에 설정
<context-param>
<param-name>log4jConfigLocation</param-name>
<param-value>/WEB-INF/log4j.properties</param-value>
</context-param>
3. 클래스에서 직접 로드
org.apache.log4j.PropertyConfigurator.configure(logPath);
VIII. 설정 포맷
① 로그파일명 포맷 (DatePattern)
로그파일명 포맷입니다. 날짜, 시간 및 분단위로까지 로그 파일을 분리할 수 있습니다.
| 형식 | 설명 |
| '.'yyyy-MM | 매달 첫번째날에 로그파일을 변경합니다 |
| '.'yyyy-ww | 매주의 시작시 로그파일을 변경합니다. |
| '.'yyyy-MM-dd | 매일 자정에 로그파일을 변경합니다. |
| '.'yyyy-MM-dd-a | 자정과 정오에 로그파일을 변경합니다. |
| '.'yyyy-MM-dd-HH | 매 시간의 시작마다 로그파일을 변경합니다. |
| '.'yyyy-MM-dd-HH-mm | 매분마다 로그파일을 변경합니다. |
② PatternLayout 포맷
로그자체를 어떤 포맷으로 남길지 결정합니다.
layout에는 HTMLLayout, PatternLayout, SimpleLayout, XMLLayout등이 있으며 PatternLayout이 일반적으로 가장 많이 쓰입니다.
| 형식 | 설명 |
| %p | debug, info, warn, error, fatal 등의 priority 가 출력된다. |
| %m | 로그내용이 출력됩니다 |
| %d | 로깅 이벤트가 발생한 시간을 기록합니다. 포맷은 %d{HH:mm:ss, SSS}, %d{yyyy MMM dd HH:mm:ss, SSS}같은 형태로 사용하며 SimpleDateFormat에 따른 포맷팅을 하면 된다 |
| %t | 로그이벤트가 발생된 쓰레드의 이름을 출력합니다. |
| %% | % 표시를 출력하기 위해 사용한다. |
| %n | 플랫폼 종속적인 개행문자가 출력된다. \r\n 또는 \n 일것이다. |
| %c | 카테고리를 표시합니다 예) 카테고리가 a.b.c 처럼 되어있다면 %c{2}는 b.c가 출력됩니다. |
| %C | 클래스명을 포시합니다. 예) 클래스구조가 org.apache.xyz.SomeClass 처럼 되어있다면 %C{2}는 xyz.SomeClass 가 출력됩니다 |
| %F | 로깅이 발생한 프로그램 파일명을 나타냅니다. |
| %l | 로깅이 발생한 caller의 정보를 나타냅니다 |
| %L | 로깅이 발생한 caller의 라인수를 나타냅니다 |
| %M | 로깅이 발생한 method 이름을 나타냅니다. |
| %r | 어플리케이션 시작 이후 부터 로깅이 발생한 시점의 시간(milliseconds) |
| %x | 로깅이 발생한 thread와 관련된 NDC(nested diagnostic context)를 출력합니다. |
| %X | 로깅이 발생한 thread와 관련된 MDC(mapped diagnostic context)를 출력합니다. |
예시) (같은 색끼리 보시면 됩니다)
위의 test.jsp를 다음 포맷으로 출력해본다면
[%c] [%C] [%d] [%F] [%l] [%L] [%m] [%M] [%n] [%p] [%r] [%t] [%x] [%X]는 다음과 같다
[test.jsp] [org.apache.jsp.test_jsp] [2005-03-10 12:37:23,561] [test_jsp.java] [org.apache.jsp.test_jsp._jspService(test_jsp.java:64)] [64] [fatal!!] [_jspService] [개행] [FATAL] [765567] [http-8080-Processor25] [] []
=============================================
본문서는 자유롭게 배포/복사 할수 있지만
이문서의 저자에 대한 언급을 삭제하시면 안됩니다
저자 : GoodBug (unicorn@jakartaproject.com)
최초 : http://www.jakartaproject.com
=============================================
log4j를 적용한 로깅 예제
// 로거 임포트하기
import org.apache.log4j.Logger;
public class ClassName {
/** Log4J 로거 얻기 */
private Logger log = Logger.getLogger(ClassName.class);
public void method() {
if (log.isDebugEnabled()) {
log.debug("디버깅용 메시지");
}
log.info("정보를 남기기위한 메시지");
try {
// 어쩌구 저쩌구 실행...
} catch (Exception ex) {
// 로그에 예외 메시지도 함께 남기기
log.error("예외가 발생했어요~~", ex);
}
}
}
--------------------------------------------------------------------------------
프로바이더 mailto: madvirus@madvirus.net:
현재 티페이지 글로벌(주)의 기술연구소에 있으며,
'JSP 웹 어플리케이션 개발(가메출판사)'을 이동훈씨와 함께 저술한 바 있다.
--------------------------------------------------------------------------------
관련자료
예제 소스 코드
관련링크
Log4j 프로젝트 홈페이지
http://jakarta.apache.org/log4j/index.html
Sun의 로깅 API 규약
http://java.sun.com/aboutJava/communityprocess/jsr/jsr_047_log.html
varchar(10)의 의미?
- 한글 5자, 영문 10자 입력 가능
nvarchar(10)의 의미?
- 한글,영문 5자 입력 가능
한글, 영문을 제외한 다국어 언어를 사용하기 위해서는 nvarchar를 사용해야 한다.
참고 자료 : 데이터 형식(Transact-SQL)
실질적으로 테스트 해보지는 않았습니다.
훗날 사용할거 같아서...
-----------------------------------------------------------------------------------------
Google Blogger API는 ATOM 이라고 하는 표준(아직도 진행중) 을 이용하여 인증, 조회, 수정, 생성을 할 수 있도록 방법을 제공한다. 하지만 처음 API를 사용하여 Google Blogger를 제어하는 사용자에게는 예제의 부적절함 혹은 부족으로 상당한 시행착오를 겪는다 물론 그렇지 않은 사람들도 있다.
혹시 다른 분들도 시행착오를 겪을 수 있으므로 조금이나 도움이 되었으면 좋겠다.
Google Blogger API : http://code.blogger.com/archives/atom-docs.html
개발환경 : Jdk1.5와 HttpClient3.0
기본적으로 읽기/쓰기 등을 하기 위해서는 먼저 인증절차를 거쳐야 한다.
이 인증은 모든 atom request 에 적용되어야 한다.
Google Blogger는 모든 ATOM reqeust 를 HTTP Basic Authentication을 SSL 방식으로 인증한다.
Google Blogger API 의 자료를 보면 아래와 같이 사용자의 블로그 리스트를 얻어 오는데
Get a List of a User's Blogs:
GET /atom HTTP/1.1
Host: www.blogger.com
Authorization : BASIC c3RldmVqOm5vdGFyZWFscGFzc3dvcmQ=
이 때 Authorization: BASIC c3RldmVqOm5vdGFyZWFscGFzc3dvcmQ= 이 부분이 사용자 아이디와 패스워드로 생성된 credential이다. 이 Credential을 이용하여 google blogger server와의 인증을 하게 된다.
Http Request를 위와 같은 형태로 생성하여 보내줄 수만 있으면 되는 것이다.
그럼 위의 내용을 HttpClient를 이용하여 구현하면 아래와 같이 mehtod를 구현할 수 있다.
public String getAuthByAtom() {
HttpClient client = new HttpClient();
// userid, passwd는 실제로 존재하는 것을 사용한다.
// 빨간글자의 코드가 시행착오를 겪었던 부분임.
client.getState().setCredentials(
new AuthScope("www.blogger.com", 443, "Blogger"),
new UsernamePasswordCredentials("userid", "passwd")
);
// user의 블로그 리스트를 조회하는 url 임
GetMethod get = new GetMethod("https://www.blogger.com/atom");
get.setDoAuthentication( true );
try {
int status = client.executeMethod(get);
System.out.println(status + "\n" + get.getResponseBodyAsString());
} catch (Exception e) {
System.out.println(e.toString());
} finally {
get.releaseConnection();
}
return get.getResponseBodyAsString()
}
위의 코드는 결과로 아래와 같은 XML을 return 한다.
특정 user가 가지고 있는 블로그의 리스트이다.
<?xml version="1.0" encoding="utf-8" standalone="yes"?>
<feed xmlns="http://purl.org/atom/ns#">
<userid xmlns="http://www.blogger.com/atom/ns#">27275760</userid>
<link href="https://www.blogger.com/atom/30952142" rel="service.post" title="Open everything" type="application/atom+xml"/>
<link href="https://www.blogger.com/atom/30952142" rel="service.feed" title="Open everything" type="application/atom+xml"/>
<link href="http://kimkun.blogspot.com" rel="alternate" title="Open everything" type="text/html"/>
</feed>
이 api를 사용하는 개발자들은 return 되어 오는 xml 데이타를 적절히 파싱하여 사용하면 될 것이다.
다른 Google Blogger API도 위와 같은 원리로 http basic authentication을 이용하여 인증절차를 거치고특정 url을 호출하여 원하는 기능을 수행하도록 한다.
인증은 위의 코드로 수행을 하고 ROME(http://wiki.java.net/bin/view/Javawsxml/Rome) 을 이용하여 xml format으로 생성하거나 parsing을 하면 xml 관련된 작업을 수월하게 할 수 있을 것이다.
[출처] Google Blogger API 사용|작성자 김군
출처 : http://bloping.tistory.com/108
심심한 잠깐팁...
[운동화 속 냄새 줄이는 방법]
앞으로 다가오는 여름이면 운동화를 즐겨 신으시는 분들은 발냄새 때문에 신경이 쓰일꺼라 생각합니다.
여러가지 방법이 있지만 제가 알고 있는 방법이 하나 있어 짧게 나마 글로 알려 드리고 블로그가 완성성되면 손쉽게 운동화 세탁 하는 방법과 함께 좀 더 자세하게 포스팅 하도록 하겠습니다.
준비물- 평상시 신고단니는 운동화 깔창, 집안에 굴러 단니는 안입거나 오래된 청바지
우선 운동화를 세탁하고 나서 깔창을 다 말린다음 안입는 청바지를 운동화 깔창에 맞게 본을 뜹니다.
여기서 청바지로 깔창 본을 뜰때 운동화 깔창보다 조금 여유(약 15cm정도)를 두고 자르셔야 되고요
그리고 나서 본을 뜬 청깔창을 운동화 깔창에 덮고 테두리를 재봉등으로 바느질을 꼼꼼하게 하시면 끝
그러면 청바지를 만드는 섬유(무슨섬유인지는 잘 생각이 안나네요)성분이 발냄새를 없애주는 역할을 한다고 합니다. 저 같은경우 구두보다는 대부분 운동화를 즐겨 신다보니 발냄새가 좀 신경 쓰였는데 이 방법을 쓰고나서는 발냄새가 많이 줄어 들었답니다. 운동화 매니아분들은 한번쯤 청바지로 만들어 사용해 보세요.
당연히 아시는 분들은 복습인거 아시죠 ㅋㅋ 심심한 짧은 포스팅 끝
 정보처리기사.hwp
public static void arraycopy(Object sarr, /*원본배열.*/
int st_position, /*원본배열의 시작위치*/
Object earr, /*복사할 배열*/
int ed_position, /* 복사할 배열의 시작위치 */
int length) /*복사할 개수.*/
System.arraycopy(a, 2, b, 3, 4);
위와 같이 arraycopy를 이용하는 방법과 다음의 clone을 이용하는 방법이 있습니다.
int[] a = (int[])b.clone();
출처 : http://yayongi.tistory.com/category/Programming/JAVA
테이블 이름 변경
RENAME TABLE 이전테이블명 to 바꿀테이블명;
컬럼
추가하기
ALTER TABLE 테이블명 ADD 컬럼명 데이터타입;
테이블에서
컬럼만 제거
ALTER TABLE 테이블명 DROP COLUMN 컬럼명;
컬럼명 변경
ALTER TABLE 테이블명 CHANGE 이전컬럼명 바꿀컬럼명
데이터타입;
UNIQUE 설정을 해제
ALTER TABLE 테이블명 DROP INDEX 인덱스명;
PK 변경
1. PK로 참여할 컬럼조건이 NULL값이 아니어야 한다.
2. ALTER TABLE 구문에서 기존 값 삭제와 새로운 정의를 함께
수행한다.
ALTER TABLE 테이블명 DROP PRIMARY KEY, ADD PRIMARY KEY (키컬럼명);
metaweblog api 사용하여 티스토리에 게시물 작성하기
xml-rpc 3.1 사용
*/
import java.util.*;
import org.apache.xmlrpc.client.XmlRpcClient;
import org.apache.xmlrpc.client.XmlRpcClientConfigImpl;
// The location of our server.
private final static String SERVER_URL ="http://name.tistory.com/api";
//ex) 티스토리 환경설정 > 기타설정 하단에 있어요.
try {
XmlRpcClientConfigImpl config = new XmlRpcClientConfigImpl();
//구버젼에선 XmlRpcClient 객체를 생성할때 주소를 지정했지만 xmlrpc 3.x대에선
//XmlRpcClientConfigImpl 객체를 통해서 지정하는거 같습니다.
config.setServerURL(new java.net.URL(SERVER_URL));
Vector params = new Vector();
//ex) 143222 티스토리 환경설정 > 기타설정 하단에 있어요.
params.addElement(new String("Tistory 로그인 아이디"));
//ex) 티스토리는 이메일주소를 쓰죠?
params.addElement(new String("Tistory 비밀번호"));
//비밀번호 다들 아시죠?
Hashtable hashtable = new Hashtable();
hashtable.put( "title", "제목을 입력하세요" );
hashtable.put( "description", "내용을 입력하세요." );
hashtable.put( "mt_keywords", "태그를 입력하세요.");
String category[] = new String[1];
category[0] = "분류이름을 입력하세요";
hashtable.put( "categories", category);
params.addElement(hashtable );
params.add( new Boolean( true ));
//true몇 공개 false면 비공개
//포스팅된 번호가 나옵니다.
} catch (XmlRpcException exception) {
System.err.println("JavaClient: XML-RPC Fault #" + Integer.toString(exception.code) + ": " + exception.toString());
} catch (Exception exception) {
System.err.println("JavaClient: " + exception.toString());
}
}
}
 xmlrpc-3.1-bin.tar.gz